Table of Contents:

 On the screen, you’ll see a range of objectives the campaign is supposed to meet. In the case of product listing ads campaigns, you can select goals such as:
 Then, go to the section with the campaign type. Choose “Shopping”.
 Once you select this option, you’ll see a pop-up window where you’ve to select your Google Merchant Center account and the country where you sell products.
If your GMC account is configured properly for product listing ads, you shouldn’t have any problems with accessing your account ID.
Move the mouse over the “select account” box to see a list with GMC account ID numbers that are linked to your Google Ads account. Find and select yours, then, choose the country.
Once you select this option, you’ll see a pop-up window where you’ve to select your Google Merchant Center account and the country where you sell products.
If your GMC account is configured properly for product listing ads, you shouldn’t have any problems with accessing your account ID.
Move the mouse over the “select account” box to see a list with GMC account ID numbers that are linked to your Google Ads account. Find and select yours, then, choose the country.
 Now, move on to selecting the campaign subtype. Tick “standard Shopping campaign” and “next”.
*Smart shopping campaigns - combine features of remarketing and shopping campaigns. These campaigns benefit from automated ad placement on websites and automatically adjust bids to highlight your products. However, in today’s entry, we’re going to focus on regular PLA campaigns.
Now, move on to selecting the campaign subtype. Tick “standard Shopping campaign” and “next”.
*Smart shopping campaigns - combine features of remarketing and shopping campaigns. These campaigns benefit from automated ad placement on websites and automatically adjust bids to highlight your products. However, in today’s entry, we’re going to focus on regular PLA campaigns.
 It’s time to talk about general settings. We’d like to mention that this configuration resembles the one you did for Google Ads campaigns (text or display ads, etc.). So, if you’re experienced in any type of campaign, you certainly won’t consider this section rocket science.
Enter the name of your campaign. Proceed to bidding and budget settings.
Similar to other campaigns, Google offers a few bidding strategies. To see options available for PLA campaigns, click the arrow on the right under “determine a bid strategy”.
It’s time to talk about general settings. We’d like to mention that this configuration resembles the one you did for Google Ads campaigns (text or display ads, etc.). So, if you’re experienced in any type of campaign, you certainly won’t consider this section rocket science.
Enter the name of your campaign. Proceed to bidding and budget settings.
Similar to other campaigns, Google offers a few bidding strategies. To see options available for PLA campaigns, click the arrow on the right under “determine a bid strategy”.
 You can select from:


 Once you choose a specific bid strategy, move on to determining the daily budget you want to allocate to your PLA campaign.
 Then, select the focus of the campaign. It’s advisable to change the default setting only if you're running multiple campaigns with the same product. If we assume that you run several campaigns for the same product, the higher priority will determine which campaign is going to be taken into account during the ad auction, even if you choose higher bids for other campaigns. If a number of campaigns have the same goal, the selected bid determines which product is displayed.
 When you scroll down the page, you’ll see the “networks” section. Here you can specify whether your ads should be displayed in the search network or whether you want to expand the reach to Gmail, YouTube and Google Discovery.
 Now it’s time to choose devices (smartphones, computers, tablets) your ads are supposed to be shown on - by default ads appear on all devices.

 If your campaign is supposed to be active within a specific timeframe, you can optionally specify the start and end date.
 Naming the ad group is one of the last steps taken when creating PLA campaigns. Finally, click “save” - you’ve just created a standard Shopping campaign.
 Once you've gone through all the setup steps described above and created your campaign, you'll automatically be redirected to the main panel of your Google Ads account and the product groups page. As you can probably notice, it’s the product group of your newly created PLA campaign. Click its name or the "Ad groups" section.
 When you create a shopping campaign, one product group called "All products" is generated by default - this means that it includes the entire product range found in the product file on your GMC account.
Be careful!
Google makes it possible to divide your campaign into different product groups according to:
When you create a shopping campaign, one product group called "All products" is generated by default - this means that it includes the entire product range found in the product file on your GMC account.
Be careful!
Google makes it possible to divide your campaign into different product groups according to:
 You’ll see a separate window. Click the arrow on the right to select the type of product group subdivision. Choose the suitable subdivision option from the expanded list.

 Then, select the product group you want to promote and click "continue to change bids" or "save without changing bids". Here, you can set different bids for the newly created product groups or leave the previously chosen ones for the entire group.


- A Few Words About Product Listing Ads In Google Ads
- A Step-By-Step Guide To Product Listing Ads Campaigns (PLA)
A Few Words About Product Listing Ads In Google Ads
If you’ve any experience with Google Ads campaigns, you must have heard about product listing ads. PLA campaigns are displayed in the search results, on partner websites, in the Google search network, in the shopping tab, and in the display network. The fact that they include key information about the product such as its name, price, or photo makes them stand out from the crowd. This type of campaign supports sales, advertises the product range, reaches potential customers, and attracts website traffic. Thus, it’s certainly worth implementing them.
What Is Needed To Run PLA Campaigns?
- Configured Google Merchant Center account
- Properly uploaded and configured product file
- Google Ads account
- Linked GMC and Google Ads account
A Step-By-Step Guide To Product Listing Ads (PLA) Campaigns
In order to create a PLA campaign, go to your Google Ads account and click “all campaigns” and “+” in the section “campaigns”.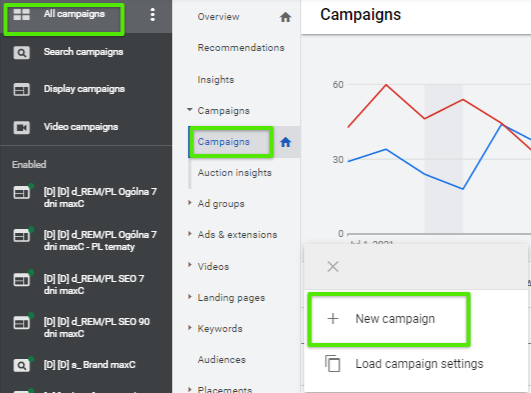 On the screen, you’ll see a range of objectives the campaign is supposed to meet. In the case of product listing ads campaigns, you can select goals such as:
- Sales - improve sales and conversion rate (the most frequently chosen goal of PLA campaigns),
- Potential customers - encourage potential customers to get to know your products,
- Website traffic - encourage users to visit your site.
 Then, go to the section with the campaign type. Choose “Shopping”.
 Once you select this option, you’ll see a pop-up window where you’ve to select your Google Merchant Center account and the country where you sell products.
If your GMC account is configured properly for product listing ads, you shouldn’t have any problems with accessing your account ID.
Move the mouse over the “select account” box to see a list with GMC account ID numbers that are linked to your Google Ads account. Find and select yours, then, choose the country.
Once you select this option, you’ll see a pop-up window where you’ve to select your Google Merchant Center account and the country where you sell products.
If your GMC account is configured properly for product listing ads, you shouldn’t have any problems with accessing your account ID.
Move the mouse over the “select account” box to see a list with GMC account ID numbers that are linked to your Google Ads account. Find and select yours, then, choose the country.
 Now, move on to selecting the campaign subtype. Tick “standard Shopping campaign” and “next”.
*Smart shopping campaigns - combine features of remarketing and shopping campaigns. These campaigns benefit from automated ad placement on websites and automatically adjust bids to highlight your products. However, in today’s entry, we’re going to focus on regular PLA campaigns.
Now, move on to selecting the campaign subtype. Tick “standard Shopping campaign” and “next”.
*Smart shopping campaigns - combine features of remarketing and shopping campaigns. These campaigns benefit from automated ad placement on websites and automatically adjust bids to highlight your products. However, in today’s entry, we’re going to focus on regular PLA campaigns.
 It’s time to talk about general settings. We’d like to mention that this configuration resembles the one you did for Google Ads campaigns (text or display ads, etc.). So, if you’re experienced in any type of campaign, you certainly won’t consider this section rocket science.
Enter the name of your campaign. Proceed to bidding and budget settings.
Similar to other campaigns, Google offers a few bidding strategies. To see options available for PLA campaigns, click the arrow on the right under “determine a bid strategy”.
It’s time to talk about general settings. We’d like to mention that this configuration resembles the one you did for Google Ads campaigns (text or display ads, etc.). So, if you’re experienced in any type of campaign, you certainly won’t consider this section rocket science.
Enter the name of your campaign. Proceed to bidding and budget settings.
Similar to other campaigns, Google offers a few bidding strategies. To see options available for PLA campaigns, click the arrow on the right under “determine a bid strategy”.
 You can select from:
- target return on ad spend (ROAS),
- maximize clicks,
- manual CPC bidding.


 Once you choose a specific bid strategy, move on to determining the daily budget you want to allocate to your PLA campaign.
 Then, select the focus of the campaign. It’s advisable to change the default setting only if you're running multiple campaigns with the same product. If we assume that you run several campaigns for the same product, the higher priority will determine which campaign is going to be taken into account during the ad auction, even if you choose higher bids for other campaigns. If a number of campaigns have the same goal, the selected bid determines which product is displayed.
 When you scroll down the page, you’ll see the “networks” section. Here you can specify whether your ads should be displayed in the search network or whether you want to expand the reach to Gmail, YouTube and Google Discovery.
 Now it’s time to choose devices (smartphones, computers, tablets) your ads are supposed to be shown on - by default ads appear on all devices.
Tip: if this is your first PLA campaign, start with the default display option. After some time, analyze the statistics - change the bids according to the effectiveness or exclude devices that don't convert.
Then, set the location where your ads are going to be displayed. Google gives you a lot of space in this case, you can narrow down the location to a particular country, region, or city.

 If your campaign is supposed to be active within a specific timeframe, you can optionally specify the start and end date.
 Naming the ad group is one of the last steps taken when creating PLA campaigns. Finally, click “save” - you’ve just created a standard Shopping campaign.
 Once you've gone through all the setup steps described above and created your campaign, you'll automatically be redirected to the main panel of your Google Ads account and the product groups page. As you can probably notice, it’s the product group of your newly created PLA campaign. Click its name or the "Ad groups" section.
 When you create a shopping campaign, one product group called "All products" is generated by default - this means that it includes the entire product range found in the product file on your GMC account.
Be careful!
Google makes it possible to divide your campaign into different product groups according to:
When you create a shopping campaign, one product group called "All products" is generated by default - this means that it includes the entire product range found in the product file on your GMC account.
Be careful!
Google makes it possible to divide your campaign into different product groups according to:
- brands
- product ID
- product type (your own categorization)
- channel (the method of selling products: locally or online)
- channel exclusivity
- condition
- label (custom labels, created by you)
 You’ll see a separate window. Click the arrow on the right to select the type of product group subdivision. Choose the suitable subdivision option from the expanded list.

 Then, select the product group you want to promote and click "continue to change bids" or "save without changing bids". Here, you can set different bids for the newly created product groups or leave the previously chosen ones for the entire group.

Tip: Once you complete this stage, review your campaign settings in its side panel. We recommend determining your ad schedule, adding target groups, applying negative keywords (such as free, bad, cheap), and excluding specific recipients. It’s also worth making sure that the options chosen when creating the campaign are saved - Google may “forget” to do it.


![How to Create an Ad That Will STAND Out? + [VIDEO]](https://delante.co/wp-content/uploads/2023/11/how-to-create-ads-that-stand-out.jpg)